Your Voice, Your Script: Building an AI Voiceover Studio You Actually Own (Part 1 of 3)
Every few weeks a new AI voice tool shows up in my feed. Upload a sample, type your script, get a voiceover in your own voice. They’re good, too. Some of them are genuinely impressive.
But every one of them asks for the same thing first: your voice. A recording of you, sent to someone else’s servers, kept on terms you probably skimmed. For a photo, maybe that’s fine. For my voice, the one thing people recognise me by on a call, I wasn’t comfortable with it.
So I asked myself the question I keep asking about AI in general: what would it actually take to build this properly? Not a weekend demo. Something I’d use for my own videos, with guardrails I can point to, running in an account I control.
This series is the answer, as far as I’ve got with it. It’s three parts, and the code is all public. I’ve written it for developers who are comfortable with AWS basics but new to voice AI, so the voice side gets explained from the ground up and the AWS side doesn’t. I don’t have everything figured out here, and you may well have made some of these choices differently. I’d like to hear where.
By the end of this part you’ll know how voice cloning works under the hood, which open models you can legally build on, what the guardrails are and why they’re in the code, and you’ll have the studio running in your own AWS account. Part 2 opens up the pipeline and the UI. Part 3 is the AWS side and the real bill.
What I built#
A small web app with three steps.
- Your voice. You read one sentence aloud, once: “I am recording my own voice, and I agree to it being used to create voiceovers for my own videos.” That one recording does three jobs: it’s your consent, it’s the sample the model learns your voice from, and its words are the transcript the model needs.
- Your script. You describe the video (“a short intro for my desk-setup video, three habits that keep my workspace tidy”), pick a length and a tone, and a language model drafts the script. You edit it until it sounds like you.
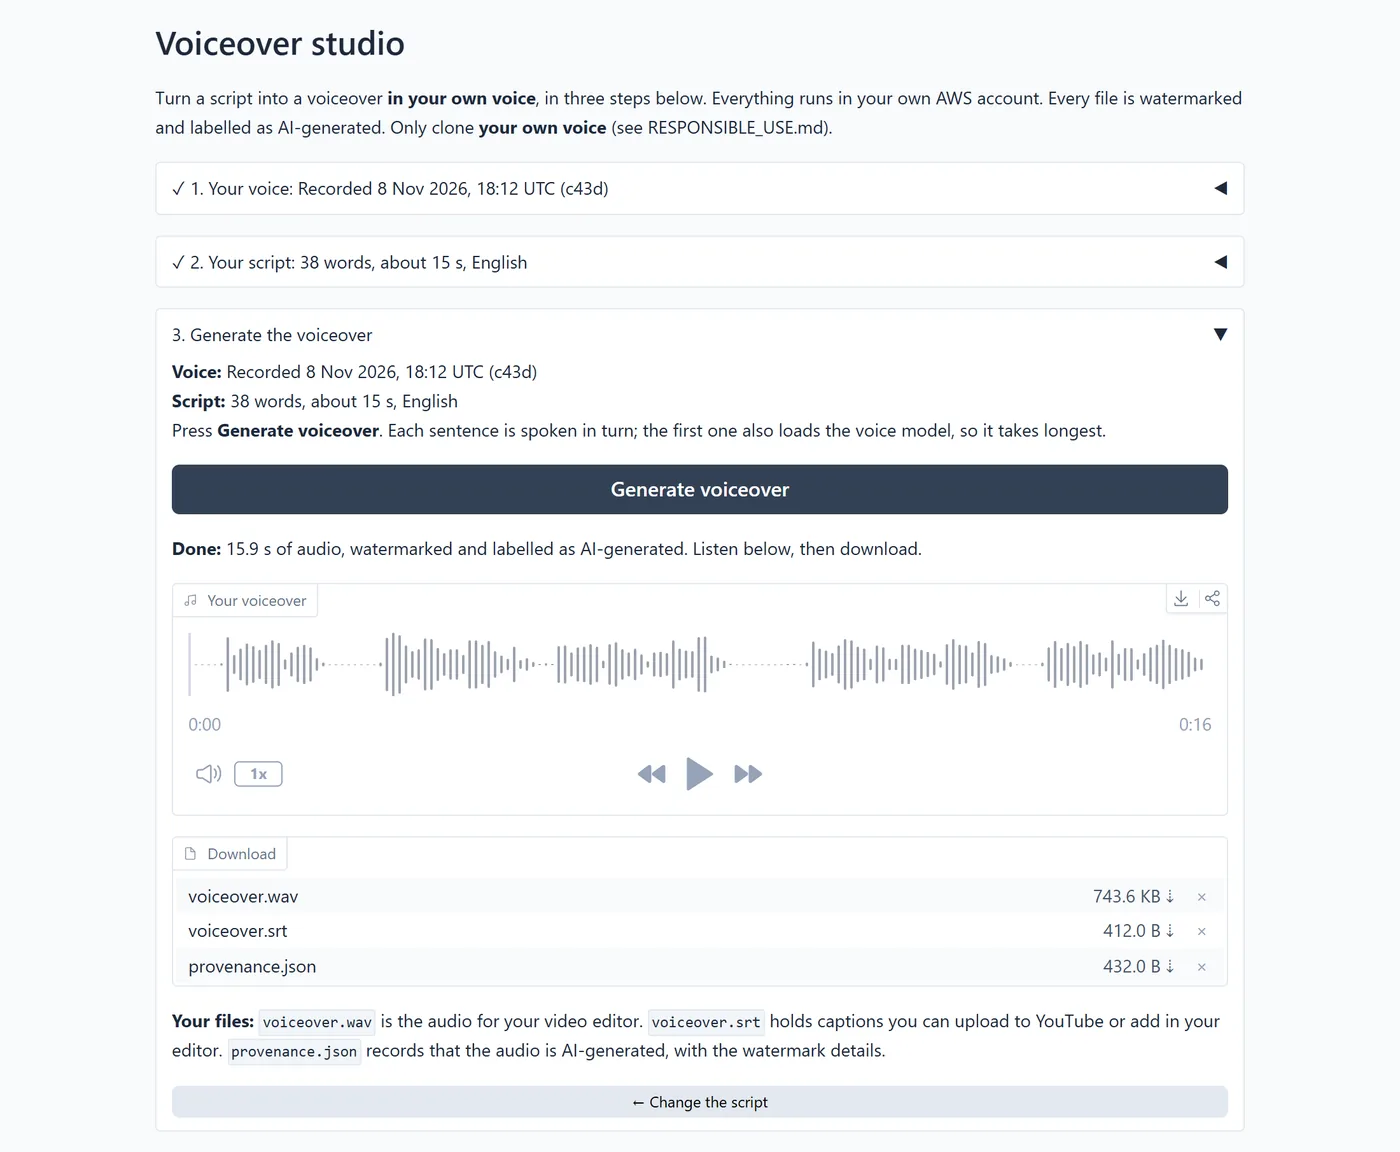
- Generate. The tool reads it back in your voice, sentence by sentence. You get the audio, captions you can upload to YouTube, and a small file stating that the audio is AI-generated.
The first time I ran it end to end, a 66-second voiceover came back in under a minute. I played it twice before I believed it was the model and not a recording of me. That was the bar I’d set: something I’d actually use, not something that merely works.
Here’s what that sounds like. The samples in this series don’t use my voice. A model designed a voice that belongs to nobody, from a one-line description, and that voice read the consent sentence: that’s the first clip. The second is the studio cloning it from those few seconds and reading a script it never heard.
Why I didn’t just use an API#
The obvious way to build this is to call a hosted voice API and be done in an afternoon. I went the other way, on purpose, and it’s worth saying why.
In my last article I argued that running open-weight models yourself isn’t the free lunch it’s sometimes made out to be. The hardware you need is exactly what got expensive this year, so for most teams the break-even point moved further out, not closer. I still believe that. But “for most teams” isn’t “for every use case”, and this one has two things going for it.
First, the data is the point. A voice is biometric-like data. Keeping it inside an account I own, on a server nobody else can reach, isn’t a nice-to-have here. It’s the reason to build the thing at all.
Second, you only pay while it’s on. One GPU server costs about $0.80 an hour while it runs, and it switches itself off when nobody’s using it. A one-minute voiceover costs about a cent of GPU time. For occasional use, that maths works. For a team generating hours of audio every day, a hosted API would likely win, and I’d tell you to use one.
So my bet is this: for a personal or small-team tool that handles sensitive data, self-hosting open models is worth the extra effort. Not because it’s cheaper. Because it’s yours.
Ten seconds of you: how voice cloning works#
Text-to-speech (TTS) turns text into audio. The older systems came with a fixed set of voices, each recorded by someone over many hours in a studio. Voice cloning means the model speaks in a voice it has never been trained on, from a short sample.
The kind we use is called zero-shot cloning, and the easiest way I’ve found to think about it is an impressionist. Nobody trains an impressionist on your voice for weeks. They listen to you for a few seconds and then speak as you, saying things you never said. Nothing about the model changes. It just listens to your sample every time it speaks.
Under the hood, modern TTS models work a lot like the chat models we all use now. A chat model predicts the next word. These predict the next small piece of audio:
flowchart LR
  sample["Your sample<br/>(10 s of audio)"] --> listen["The model listens:<br/>how you sound"]
  words["The exact words<br/>in the sample"] --> listen
  text["Your script"] --> lm["Language model<br/>predicts audio tokens"]
  listen --> lm
  lm --> codec["Codec decoder<br/>tokens → waveform"]
  codec --> wav["Speech in your voice<br/>(24,000 samples a second)"]
A few terms you’ll meet through the series:
- Audio tokens. A neural codec compresses audio into a short sequence of numbers, a bit like words for sound. The model I use, Qwen3-TTS, works with about 12 frames of audio per second (the “12Hz” in its name; 12.5, to be exact), and each frame is a small stack of tokens. The language model writes those tokens; the codec turns them back into sound.
- Reference audio. Your sample. The model picks up your timbre (what makes your voice yours), your pace and your accent from it. A clean, quiet sample matters far more than a long one: 5 to 15 seconds is plenty.
- Reference transcript. The exact words spoken in the sample. Cloning gets noticeably better when the model knows them.
That last one is where the design clicked for me. If you ask the user to read a sentence we chose, you get the transcript for free. And if that sentence is a consent statement, the same ten seconds do three jobs: consent, voice sample and transcript. In the code it comes down to one line:
# The model gets the sentence you were asked to read: the exact transcript of the clip.
return VoiceReference(local_path, record["sentence"], consent_id=record["consent_id"])
Read the code: the repo has a guided tour that follows one voiceover through the app, from the recording to the finished file. Start with How a voiceover is made.
The licence trap#
There are plenty of open voice models, and most of them you can’t use for this. Not because they’re bad, but because of their licence. A model you can’t use commercially is fine for an experiment. It’s not fine for a tool you’ll put your own videos through, or one you’re inviting readers to run.
This was my shortlist in November 2026:
| Model | Licence | Clones a voice? | Used here? |
|---|---|---|---|
| Qwen3-TTS 1.7B | Apache-2.0, code and weights | Yes, from a short clip | Yes. 10 languages, about 4 GB, fits next to the LLM on one GPU |
| Chatterbox | MIT | Yes | No. Retired by its makers, unmaintained since August 2026 |
| XTTS-v2, F5-TTS, Fish S2 Pro, IndexTTS | Non-commercial or custom terms | Yes | No. The licence |
| Kokoro | Apache-2.0 | No, preset voices only | No. Can’t clone |
For writing the scripts I use Qwen3.5-9B (also Apache-2.0), squeezed to 4 bits per weight so it needs about 9 GB of GPU memory instead of 18. Both models share one 24 GB GPU: the script writer takes about half, the voice model most of the rest.
The lesson I’d pass on: read the licence of the weights, not just the code. Several popular projects have MIT- or Apache-licensed code sitting on top of weights you can’t use commercially. It’s an easy thing to miss, and an expensive one to find out about later.
Everything in your own account#
flowchart LR
  subgraph you["Your computer"]
    browser["Browser<br/>localhost:7860"]
    scripts["Deploy scripts"]
  end
  subgraph aws["Your AWS account"]
    subgraph gpu["One GPU server · no open ports"]
      app["Studio app<br/>voice model · watermark"]
      llm["Script writer<br/>Qwen3.5-9B"]
    end
    bucket[("Private bucket<br/>voices · outputs")]
  end
  browser -- "private tunnel (SSM)" --> app
  app --> llm
  app --> bucket
  scripts -- "set up · update · remove" --> aws
Four decisions shape everything else:
- Single user, self-hosted. It runs in your account and only you use it. There’s no “try it here” website, and there won’t be. A public voice-cloning demo is exactly what this tool should never become.
- No open doors. The server accepts no connections from the internet at all. You reach the app through an
encrypted tunnel (AWS Systems Manager, or SSM for short), which your browser sees as
http://localhost:7860. A nice side effect: browsers only allow the microphone on secure pages, and localhost counts as one. - A fixed core, replaceable parts. The workflow and the guardrails live in a core that doesn’t change. The models are providers you swap in a settings file; new features are plugins. Part 2 goes into both.
- It switches itself off. After 30 minutes without anyone using it, the server stops. A second, independent alarm stops it if that ever fails.
Guardrails are code, not a settings page#
A tool that copies voices can be misused. I’d rather say that plainly than pretend otherwise. So the guardrails aren’t options in a config file. Turning them off means deliberately changing the code:
- Consent before cloning. Your sample is you reading the consent sentence. Speech recognition checks that the recording actually says it. No match, no voice.
- Your own voice only. The tool is built around recording yourself. There’s no “clone from a YouTube link” feature, and the repository contains no real person’s voice.
- Every file is marked. Each voiceover carries an inaudible watermark (Meta’s AudioSeal) and an “AI-generated” label inside the file, plus a provenance file: a record of how and when it was made. Anyone can check the watermark later.
- No impersonation scripts. Obvious requests to speak as someone else (“in the voice of…”, “pretend to be…”) are refused before they reach the language model, and the model’s own instructions refuse impersonating real people and deceptive scripts like fake news.
- Deleting means deleted. Delete a voice in the app and the recording is gone from your bucket. The bucket keeps no old versions, on purpose.
The law here is moving faster than most of us can track. The EU AI Act’s transparency rules apply from August
2026: AI systems have to mark what they generate in a machine-readable way (systems already on the market have
until December 2026), and whoever publishes a deepfake, which a cloned voice can be, has to say so. Several US
states now protect a person’s voice in law, and a voice recording can count as biometric data. The watermark and
labels take care of the marking. Telling your audience the voice is AI-generated is still on you. (Not legal
advice. The repo’s RESPONSIBLE_USE.md
spells out what the tool is and isn’t for.)
The bill is the time, not the voice#
Measured in November 2026, us-east-1, on a g6.xlarge (one NVIDIA L4 with 24 GB): the server costs about $0.80 an hour while it’s on, and a one-minute voiceover uses about a cent of that. Trying the whole thing once (set it up, use it for two hours, remove everything) comes to $2 to $4. The one cost that doesn’t stop is the disk, about $12 a month even while the server is off. Part 3 has the full numbers.
What you pay for is the time the server is on, not the voiceovers. That’s why it switches itself off, and why there’s a single command that removes everything when you’re done.
Left running for a month by mistake, a GPU server costs around $600. The project puts four layers between you and that bill: the idle auto-stop, a CloudWatch alarm, budget emails, and account-level rules that make anything bigger simply impossible. Part 3 walks through each one.
Day one: start the slow parts first#
Two things take time you can’t speed up, so start them before anything else:
- An AWS account. Your existing one works. The guardrails apply only to the project’s own deploy role, so nothing else you run in the account is affected. A separate account just keeps the bill tidy, with only this project on it. If you share the account with other work, set the project budget to your usual monthly spend plus about $30, because it counts everything in the account. Either way, have MFA on the root user.
- A GPU quota. New accounts are often allowed zero GPU servers. In the console, open Service Quotas → Amazon EC2 → “Running On-Demand G and VT instances” and ask for 4 (vCPUs, which is exactly one server). AWS approves it in anything from hours to a few days. The quota is per region, not per zone.
On your computer:
- Docker (Docker Desktop on Windows or macOS) and the AWS CLI v2, version 2.32 or newer.
- Bash for the scripts. macOS and Linux have it. On Windows, use Git Bash.
- A browser for the studio itself. In my testing, Firefox, Chrome and Edge recorded fine; Brave froze the recorder (Part 2 has the likely cause). If yours misbehaves, try another.
- Optionally a Hugging Face account. The models aren’t gated, so you don’t need one.
Everything else (Terraform, the AWS tunnel plugin) runs inside a container the scripts build for you, so it behaves the same on Windows, macOS and Linux.
Getting it running#
First, set up the account, once, with an admin login. The script creates a locked-down deploy role, the guardrails and the budget alerts. It shows you what it’s about to do and asks before changing anything:
git clone https://github.com/WornKeys/voiceover-studio.git
cd voiceover-studio
cp .env.example .env           # set BUDGET_EMAIL: the budget alerts go there
./scripts/bootstrap.sh --profile <your-admin-profile>
It then tells you the two things only you can do (a password and an MFA device for your everyday login) and prints the AWS profiles to add. From here on you work as that restricted user, never as an admin:
aws login --profile voiceover-operator   # opens the browser: password + MFA
./scripts/deploy.sh                      # first time: about 25 minutes; asks before creating anything
./scripts/connect.sh                     # then open http://localhost:7860
deploy.sh creates the server, installs everything and downloads the models, about 25 GB in all, and shows its
progress as it goes. Two more commands are worth knowing:
./scripts/stop.sh      # stop now; only the disk costs money while stopped
./scripts/destroy.sh   # remove everything, after offering to download your files
destroy.sh finishes by checking that nothing tagged with the project is left in your account. A forgotten
resource is the classic way a cloud experiment turns into a surprise bill, so I wanted that check to be part of
the tool, not a step in a blog post.
Read the code: what Terraform creates, file by file, is in
The infrastructure. What
deploy.sh actually does, from your laptop to a running app, is in
Deploying and running it.
Before you hit record#
The sample decides how good every voiceover will sound, so it’s worth two minutes:
- A quiet room beats a good microphone. Turn off the fan, close the window.
- Read naturally, at the pace you’d use in your videos. The clone copies your pace too.
- Listen back before saving. The app checks the length, distortion, volume and background noise, and tells you what to fix.
Two things from the first real run
- Request the GPU quota first. Everything else can be ready in an hour. The quota can take days.
- On Windows, run the scripts in Git Bash. PowerShell can’t run them, and a plain
bashmay quietly start WSL instead, which can’t see Docker Desktop or your AWS login. That one cost me a weekend.
The rest of what broke, and why, is in Part 3.
Where this leaves us#
What I set out to find is whether a voice tool can be useful and yours: your voice, your account, your decision every time it speaks. For one person or a small team, I think the answer is yes, at the price of an afternoon of setup and a cent a minute.
In Part 2 I’ll open it up: how the script writer hits a target length, why the text is spoken one sentence at a time, how the audio is joined, levelled and watermarked, how the three-step UI is put together, and how plugins like Fit to length and Translate slot into the core. Part 3 is the AWS side: what the scripts create, the security layers, the real costs, and everything the first test run broke.
As always, this is my view and my setup. If you’d have built it differently, or know a model worth a look, I’d be glad to hear about it in the comments.
Let the model read the script. Keep the voice, and the decision to use it, yours.
The code is MIT-licensed at github.com/WornKeys/voiceover-studio.
Discussion
Comments are powered by GitHub Discussions. Sign in with GitHub to join in.